Tuesday, December 22, 2020

Enable YUM in OCI DBaaS Compute Instances

 If you have some DBaaS computes nodes in your OCI, you will note that they don't come with any YUM repo configured by default. This is purposely architect to avoid you from installing or messing the system that you should be using "As a Service".

[root@erptest04db ~]# yum install telnet
Loaded plugins: versionlock
There are no enabled repos.
 Run "yum repolist all" to see the repos you have.
 To enable custom repositories:
     yum-config-manager --enable <repo>
[root@erptest04db ~]#


However, sometimes I need some flexibility to add some custom yum packages.

To do it, let's simply download the latest ol6 / ol7 / ol8 repo file to the yum folder as root.

First check your OS version.


[root@erptest04db ~]# cat /etc/redhat-release
Red Hat Enterprise Linux Server release 7.8 (Maipo)
[root@erptest04db ~]#
 

Now download the yum repo and the version lock file for your OS version.

Please note the versionlock file may be already present, so it's not recommended to replace it.

OL 7

  • wget -nv https://swiftobjectstorage.us-phoenix-1.oraclecloud.com/v1/dbaaspatchstore/DBaaSOSPatches/oci_dbaas_ol7repo -O /etc/yum.repos.d/ol7.repo
  • wget -nv https://swiftobjectstorage.us-phoenix-1.oraclecloud.com/v1/dbaaspatchstore/DBaaSOSPatches/versionlock_ol7.list -O /etc/yum/pluginconf.d/versionlock.list

OL 6

  • wget -nv https://swiftobjectstorage.us-phoenix-1.oraclecloud.com/v1/dbaaspatchstore/DBaaSOSPatches/oci_dbaas_ol6repo -O /etc/yum.repos.d/ol6.repo
  • wget -nv https://swiftobjectstorage.us-phoenix-1.oraclecloud.com/v1/dbaaspatchstore/DBaaSOSPatches/versionlock_ol6.list -O /etc/yum/pluginconf.d/versionlock.list

 [root@erptest04db ~]# wget -nv https://swiftobjectstorage.us-phoenix-1.oraclecloud.com/v1/dbaaspatchstore/DBaaSOSPatches/oci_dbaas_ol7repo -O /etc/yum.repos.d/ol7.repo
2020-12-22 08:49:07 URL:https://swiftobjectstorage.us-phoenix-1.oraclecloud.com/v1/dbaaspatchstore/DBaaSOSPatches/oci_dbaas_ol7repo [957/957] -> "/etc/yum.repos.d/ol7.repo" [1]
[root@erptest04db ~]# ls /etc/yum.repos.d/ol7.repo 


[root@erptest04db ~]# yum repolist all
Loaded plugins: versionlock
ol7_UEKR4                                                                                                                                                              | 2.8 kB  00:00:00
ol7_UEKR4_archive                                                                                                                                                      | 2.8 kB  00:00:00
ol7_latest                                                                                                                                                             | 3.4 kB  00:00:00
ol7_latest_archive                                                                                                                                                     | 2.8 kB  00:00:00
(1/9): ol7_UEKR4/x86_64/updateinfo                                                                                                                                     |  86 kB  00:00:01
(2/9): ol7_latest/x86_64/group_gz                                                                                                                                      | 134 kB  00:00:01
(3/9): ol7_UEKR4_archive/x86_64/updateinfo                                                                                                                             | 253 kB  00:00:01
(4/9): ol7_latest_archive/x86_64/updateinfo                                                                                                                            | 1.8 MB  00:00:00
(5/9): ol7_latest/x86_64/updateinfo                                                                                                                                    | 3.1 MB  00:00:01
(6/9): ol7_UEKR4/x86_64/primary_db                                                                                                                                     | 4.6 MB  00:00:02
(7/9): ol7_latest/x86_64/primary_db                                                                                                                                    |  30 MB  00:00:02
(8/9): ol7_latest_archive/x86_64/primary_db                                                                                                                            |  56 MB  00:00:03
(9/9): ol7_UEKR4_archive/x86_64/primary_db                                                                                                                             |  87 MB  00:00:07
Excluding 171 updates due to versionlock (use "yum versionlock status" to show them)
repo id                                                 repo name                                                                                                          status
ol7_UEKR4/x86_64                                        Latest Unbreakable Enterprise Kernel Release 4 for Oracle Linux 7Server (x86_64)                                   enabled:      124+8
ol7_UEKR4_archive/x86_64                                Unbreakable Enterprise Kernel Release 4 for Oracle Linux 7Server (x86_64) - Archive                                enabled:   1168+150
ol7_latest/x86_64                                       Oracle Linux 7Server Latest (x86_64)                                                                               enabled:  21667+904
ol7_latest_archive/x86_64                               Oracle Linux 7Server Latest (x86_64) - Archive                                                                     enabled: 24576+1211
repolist: 47535


[root@erptest04db ~]# yum install telnet
Loaded plugins: versionlock
Excluding 171 updates due to versionlock (use "yum versionlock status" to show them)
Resolving Dependencies
--> Running transaction check
---> Package telnet.x86_64 1:0.17-66.el7 will be installed
--> Finished Dependency Resolution

Dependencies Resolved

==============================================================================================================================================================================================
 Package                                    Arch                                       Version                                           Repository                                      Size
==============================================================================================================================================================================================
Installing:
 telnet                                     x86_64                                     1:0.17-66.el7                                     ol7_latest                                      64 k

Transaction Summary
==============================================================================================================================================================================================
Install  1 Package

Total download size: 64 k
Installed size: 113 k
Is this ok [y/d/N]: y
Downloading packages:
warning: /var/cache/yum/x86_64/7Server/ol7_latest/packages/telnet-0.17-66.el7.x86_64.rpm: Header V3 RSA/SHA256 Signature, key ID ec551f03: NOKEY==          ]  0.0 B/s |  55 kB  --:--:-- ETA
Public key for telnet-0.17-66.el7.x86_64.rpm is not installed
telnet-0.17-66.el7.x86_64.rpm                                                                                                                                          |  64 kB  00:00:01
Retrieving key from file:///etc/pki/rpm-gpg/RPM-GPG-KEY-oracle
Importing GPG key 0xEC551F03:
 Userid     : "Oracle OSS group (Open Source Software group) <build@oss.oracle.com>"
 Fingerprint: 4214 4123 fecf c55b 9086 313d 72f9 7b74 ec55 1f03
 Package    : 7:oraclelinux-release-7.8-1.0.7.el7.x86_64 (@pdit_ol7_latest/$releasever)
 From       : /etc/pki/rpm-gpg/RPM-GPG-KEY-oracle
Is this ok [y/N]: y
Running transaction check
Running transaction test
Transaction test succeeded
Running transaction
Warning: RPMDB altered outside of yum.
  Installing : 1:telnet-0.17-66.el7.x86_64                                                                                                                                                1/1
  Verifying  : 1:telnet-0.17-66.el7.x86_64                                                                                                                                                1/1

Installed:
  telnet.x86_64 1:0.17-66.el7

Complete!
[root@erptest04db ~]#
 

That's it!


Wednesday, November 27, 2019

How to take consistent backups at standby site

How to take an offline, consistent, self-contained backup at the standby site. The aim of this exercise is to have a self-contained backup that can be restored on its own without needing recovery.  I.e., since recovery of standby is stopped, the backup is a cold backup.  

1) stop managed recovery:
SQL> ALTER DATABASE RECOVER MANAGED STANDBY DATABASE CANCEL;

2) backup the database and controlfile

Please note :- If you have a recovery catalog configured you can connect to it and take a backup.
Both the Primary and Standby database should use the same recovery catalog. Even though these database share the same DBID,Rman is able to differentiate the standby database from Primary .
Note you do not need to register the standby database in the catalog if the primary is already registered. Simply connect to the standby as target and then connect to recovery catalog for taking backup.


RMAN> backup database plus archivelog ;

RMAN> backup current controlfile; 


Note: In 10g, you will need to backup the controlfile from the primary site.

The above will result in a consistent, self-contained backup.

3) restart managed recovery:


To restore from this backup:
RMAN> startup nomount;
RMAN> restore controlfile from 'controlfile backuppiece name and location';
RMAN> alter database mount;
RMAN> restore database;
RMAN> recover database noredo;


Sunday, November 24, 2019

Creating an SSH Key Pair on the Command Line

To create an SSH key pair on the command line using ssh-keygen:
  1. Open a shell for entering the commands.
  2. At the prompt, enter the following:
       ssh-keygen -t rsa -N "" -b "2048" -C "key comment" -f path/root_name
    where the arguments are as follows:
    -t rsaUse the RSA algorithm.
    -N "passphrase"
    Passphrase to protect the use of the key (like a password). If you don't want to set a passphrase, don't enter anything between the quotes.
    Note: While a passphrase is not required, you should specify one as a security measure to protect the private key from unauthorized use.
    -b "2048"
    Generate a 2048 bit key. You don't have to set this if 2048 is acceptable, as 2048 is the default.
    Note: A minimum of 2048 bits is recommended for SSH-2 RSA.
    -C "key comment"A name to identify the key.
    -f path/root_name
    The location where the key pair will be saved and the root name for the files. For example, if you give the root name as id_rsa, the name of the private key will be id_rsa and the public key will be id_rsa.pub.
    For example,
    Command prompt - creating key pair, specifying parameters
    Alternatively, you can simply enter ssh-keygen and then enter responses when prompted for a name and a passphrase. The keys will be created with default values: RSA keys of 2048 bits.
  3. Command prompt, creating key pair without parameters
    To see that the files were created, type ls path/root_name*, for example,
  4. Command prompt, using li command to see files
     

Creating SSH Keys for Use with Oracle Cloud Services

To generate an SSH key pair using the PuTTY Key Generator,
  1. Find puttygen.exe in the PuTTY folder on your computer, for example, C:\Program Files (x86)\PuTTY. Double-click puttygen.exe to open it.
    PuTTY Key Generator

  2. Accept the default key type, SSH-2 RSA.
    SSH-2 is the most recent version of the SSH protocol (and is incompatible with SSH-1). RSA and DSA are algorithms for computing digital signatures.
    PuTTY Key Generator parameters

  3. Set the Number of bits in a generated key to 2048 bits, if it is not already set with that value.
    This sets the size of your key and thus the security level. A minimum of 2048 bits is recommended for SSH-2 RSA.
    PuTTY Key Generator parameters

  4. Click Generate.
    Generate button

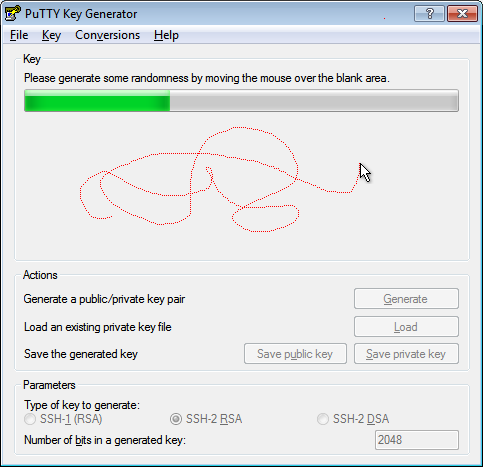
  5. Move your mouse around the blank area to generate randomness to the key.
    Note: the dotted red line in the image below is for illustration purposes only. It does not appear in the generator pane as you move the mouse.
    Generating key - status

  6. The generated key appears under Public key for pasting into OpenSSH authorized_keys file.
    Generated public key

  7. The key comment is the name of the key that you will use to identify it. You can keep the generated key comment or create your own.
    Key comment field

  8. If you want to password-protect your key, enter a Key passphrase and enter it again for Confirm passphrase. When you reload a saved private key, you will be asked for the passphrase, if one is set.
    Key passphrase fields

    While a passphrase is not required, you should specify one as a security measure to protect the private key from unauthorized use.
    There is no way to recover a passphrase if you forget it.
  9. Save the private key of the key pair. Depending how you work with the private key in the future, you may need one saved in the PuTTY PPK format and one saved in OpenSSH format. Let's do both.
    1. To save the key in the PuTTY PPK format, click Save private key to save the private key of the key pair.
      Save privatge key button

      You can name it anything you want, although you may want to use the same name as you used for the key comment. The private key is saved in PuTTY's Private Key (PPK) format, which is a proprietary format that works only with the PuTTY toolset.
      Save private key - file name and type

      You can use this key whenever you use Putty to perform SSH actions.
    2. To save the key in OpenSSH format, open the Conversions menu and select Export SSH key. This will be the same key as above, just saved in a different format.
      Save private key in OpenSSH format

      You can name it anything you want, but to keep track of your keys, you should give it the same name as the key you saved in PPK format in the previous step. You can also use any extension (or no extension), but let's use .ssh, to make it clear what format it is.
      Save private key in OpenSSH format

      You can use this key whenever you use OpenSSH to perform SSH actions using ssh utitlities that support OpenSSH, for example when using Linux in a command shell.
  10. Now you need to create the public key to be paired with the private key(s) you just created. However, clicking the Save public key button will create a public key that won't work with Oracle Cloud services in certain cases. So, for the purposes of this tutorial, there is no reason to save a public key using the Save public key button.
    Do not click Save public key button

    Instead, proceed as follows.
  11. In the PuTTY Key Generator, select all of the characters under Public key for pasting into OpenSSH authorized_keys file.
    Make sure you select all the characters, not just the ones you can see in the narrow window. If a scroll bar is next to the characters, you aren't seeing all the characters.
    Public key for pasting

  12. Right click somewhere in the selected text and select Copy from the menu.
    Public key for pasting - copy

  13. Open a text editor and paste the characters, just as you copied them. Start at the first character in the text editor, and do not insert any line breaks.
    Public key pasted into text editor

  14. Save the key as a text file, using the same root name as you used for the private key. Add a .pub extension. You can give it any extension you want, but .pub is a useful convention to indicate that this is a public key.
    Save public key - file name and type

  15. Write down the names of your public and private keys, and note where they are saved. You will need the public key when creating service instances in, for example, Oracle Java Cloud Service and Oracle Database Cloud - Database as a Service. You will need the private key when trying to access a service instance's virtual machine via SSH.

Enable YUM in OCI DBaaS Compute Instances

 If you have some DBaaS computes nodes in your OCI, you will note that they don't come with any YUM repo configured by default. This is...